[Archived] XBlock Tutorial
NOTE: this tutorial is archived and no longer maintained. For a supported XBlock tutorial, please see the official Open edX XBlock Tutorial.
This tutorial will walk you through the creation of a custom XBlock. It will allow to display a video in a course, using oEmbed, and record when the student finishes watching it.
To give you a sneak peek, the goal is to generate this:
Based on this:
1 2 3 4 5 | |
Setup
Getting help
If you get stuck, or have any question, and can't find the answer in this documentation, don't hesitate to ask for help. You can either:
- Subscribe to the edx-code@ mailing list (be sure to search for your question first before posting!)
- Join the Slack channel
Installing XBlock SDK
XBlock SDK runs on Python 2.7.
-
Grab the source code for XBlock SDK at https://github.com/edx/xblock-sdk:
1
2
$ git clone https://github.com/edx/xblock-sdk.git $ cd xblock-sdk -
(Optional) Create and activate a virtualenv to work in:
1$ mkvirtualenv xblock-sdk - Install the requirements and register the XBlock (you may need to
sudo this if you don't use virtualenv):
1$ make install - Create and sync the sqllite DB:
1$ python manage.py syncdb - Run the django development server:
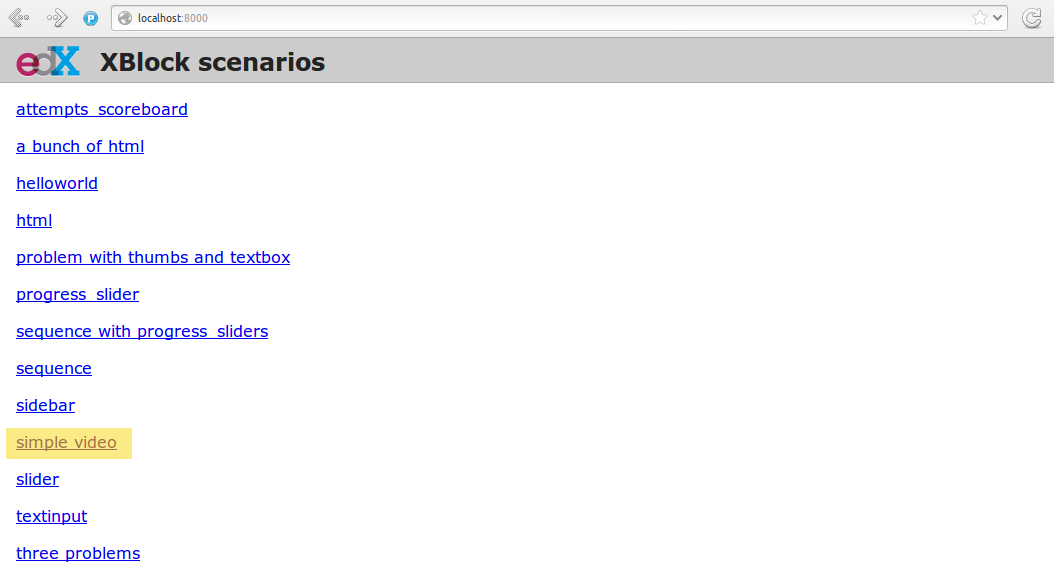
You should be able to visit http://127.0.0.1:8000/ and see something like this:
1$ python manage.py runserver
Creating a new XBlock
The simplest way to get started on a new XBlock is to use the
bin/workbench-make-xblock script from the xblock-sdk repo. It
asks for the name of your XBlock and creates a new folder containing a
working barebones XBlock with heavily commented code and all the
required boilerplate.
For this tutorial however, we will be creating our custom XBlock manually.
First create a folder for you custom XBlock outside of the
xblock-sdk repository you just cloned, and initialize a new git
repository in it:
1 2 3 4 5 | |
We are defining the <simplevideo> XBlock, which we want to allow to
accept different attributes:
1 | |
We will create a subclass of the XBlock class that we will later
register to control our <simplevideo> tag. Let's call it
SimpleVideoBlock and define it inside simplevideo.py located at
the top of the xblock-simplevideo folder.
Our <simplevideo> tag will accept three attributes: href,
maxwidth, and maxheight. We will define them as attributes of
the SimpleVideoBlock class. The simplevideo.py file should look
like this:
1 2 3 4 5 6 7 8 9 10 11 | |
We specify the type of the attributes (String / Integer), their
default values, and their scope.
All three attributes here use the predefined content scope, which
indicates a definition from the content creator, which is not specific
to a given user. See the documentation about
fields for more details.
View: HTML, templates & fragments
To be able to embed the video from https://vimeo.com/46100581 on the course, the XBlock will need to retrieve the HTML code of the video player from Vimeo. To do this, we use oEmbed, which allows to obtain information about a given URL through an API. For example: http://vimeo.com/api/oembed.json?url=https://vimeo.com/46100581.
We declare a view, which will fetch the HTML code from the oEmbed
provider, based on the value of the SimpleVideoBlock.href attribute.
The view is defined as a method on the XBlock,
SimpleVideoBlock.student_view():
1 2 3 4 5 6 7 8 9 10 11 12 13 14 15 16 17 18 19 20 21 22 23 24 25 26 27 28 29 30 31 32 33 34 35 36 37 38 39 40 41 42 43 44 45 46 47 48 49 50 51 52 53 54 55 | |
The HTML we obtained from the provider is interpolated into an HTML
template (static/html/simplevideo.html). The output is used to build
a Fragment, which is then returned for
inclusion on the page.
Static files
To load static resources, we are using Python's pkg_resources module. The
default directory structure makes use of individual css, html,
and js folders. This structure is not mandatory though, each XBlock
can choose its own, as long as it specifies the correct paths in the
call to pkg_resources.
Here we only need a very simple template, which we create in
static/html/simplevideo.html:
1 2 3 | |
This template is not strictly necessary here, as we only use it to
include the HTML returned by the oEmbed provider in a <div>, but it
will be handy to add additional HTML to our XBlock later on. It also
allows you to see how static files and templates are loaded from the
static/ subfolders, using the
pkg_resources
module. Later on, we will use the same method to load CSS and JavaScript
files.
Loading an example from the workbench (scenarios)
How do we actually use the <simplevideo> tag we just defined? Let's
say that we are producing a new course, and we want to display the video
from https://vimeo.com/46100581 to the students. This could be done
using the following markup:
1 2 3 4 5 | |
This is how courses are built - such markup constitute the basic static building block for course content. The instructor combines different XBlocks like this, to eventually have the whole course described in a XBlock document tree.
Here, we display three elements, aligned vertically using the
<vertical_demo> XBlock. First there is our video, using the
<simplevideo> tag, then an HTML <div> tag, and then a
<thumbs> XBlock, to let the students rate the video by clicking on
thumbs (up/down).
Where this markup would be specified is actually independent from XBlock
- the instantiation of XBlocks and the call of block methods/views is
performed by a runtime. However, the workbench provides a quick way to
load a set of "usages" (individual instances of XBlocks) in a scenario.
To define a scenario for the workbench, add the following method to the
SimpleVideoBlock class:
1 2 3 4 5 6 7 8 9 10 11 12 13 | |
The attributes, like href, are mapped to attributes of the XBlock
class and automatically initialized to the provided value. It allows you
to specify which video should be displayed in this particular scenario.
Registering an XBlock (entry point)
XBlocks are loaded dynamically as plugins, using the entry_points mechanism of setuptools.
XBlocks are registered by looking up entry points with the name
xblock.v1. The workbench will call the workbench_scenarios()
method on each registered XBlock, to populate the list of scenarios
displayed on its homepage.
Create the following setup.py file at the root of the
xblock-simplevideo folder:
1 2 3 4 5 6 7 8 9 10 11 12 13 14 | |
Then create the file requirements.txt to allow to register the
package, as well as automatically install other dependencies such as the
requests module we use to query the oEmbed provider:
1 2 | |
The -e . option tells to always use the latest files from the
development directory, instead of packaging the files when you run the
command.
Then run pip to register the xblock-simplevideo package and
allow XBlock to find the entry point. If you installed xblock-sdk
into a virtual environment, you need to run pip in the same virtual
environment.
1 | |
1 2 | |
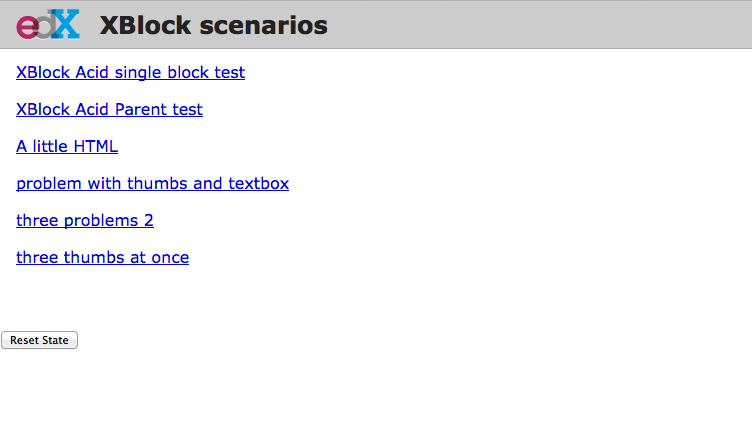
You should see the new "simple video" scenario appearing in the list from http://localhost:8000/ (highlighted in yellow on the screenshot):
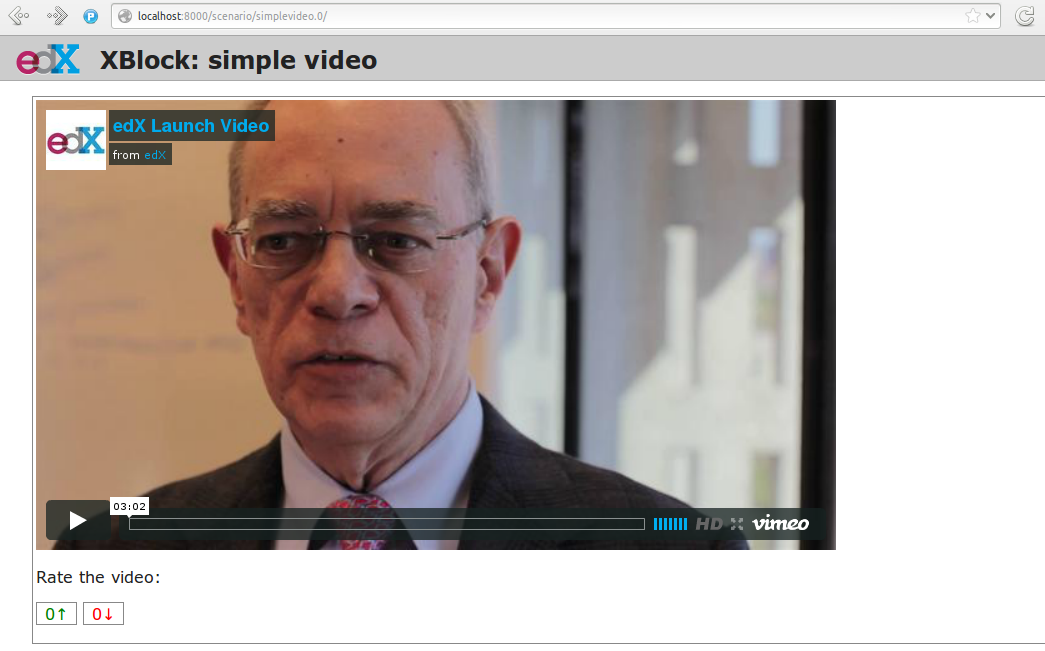
When you click it, you should see the video appearing, along with the thumb block to rate the video:
Adding CSS styling
Let's say we want to add a small margin above and below every video.
We'll do this with CSS. Create the file static/css/simplevideo.css
and put the following code in it:
1 2 3 | |
Then edit the SimpleVideoBlock.student_view() method:
1 2 3 4 5 6 7 8 9 10 11 12 13 14 15 16 | |
Reload http://localhost:8000/scenario/simplevideo.0/. Tada! You should now see bigger margins on the top & bottom of the video.
JavaScript & Ajax calls
Now, something fancier. We want to keep track of whether a student has
finished watching the video -and if he did, how many times. We'll use
JavaScript to make an Ajax call to the server when the video is
finished. For this, we load both Vimeo's JavaScript API library
(Froogaloop),
as well as our own JavaScript file, static/js/simplevideo.js:
1 2 3 4 5 6 7 8 9 10 11 12 13 14 15 16 17 | |
Update the template we created before to display the number of times the student has finished watching the video:
1 2 3 4 | |
Create the static/js/simplevideo.js file:
1 2 3 4 5 6 7 8 9 10 11 12 13 14 15 16 17 18 19 20 | |
Here we:
- Locate the
iframe, - Pass it to the Froogaloop library to get the
playerobject, - Capture
finishevents from theplayeronce it is ready, - Make an Ajax call to the
SimpleVideoBlock.mark_as_watched()method when it is fired (we obtain the URL for the Ajax call through theruntime.handlerUrl()method)
Also notice that:
- The
SimpleVideoBlock.mark_as_watched()method gets the data passed to the Ajax call, deserialized. - The
success()callback is passed the return value from themark_as_watched()method. - The
watched_countattribute from the returned result is used to update a new field,$('.simplevideo .status .watched-count').
And finally, add the mark_as_watched() method to the XBlock, along
with a new watched_count attribute, which will store the number of
times the user has completed watching the video:
1 2 3 4 5 6 7 8 9 10 11 12 13 14 | |
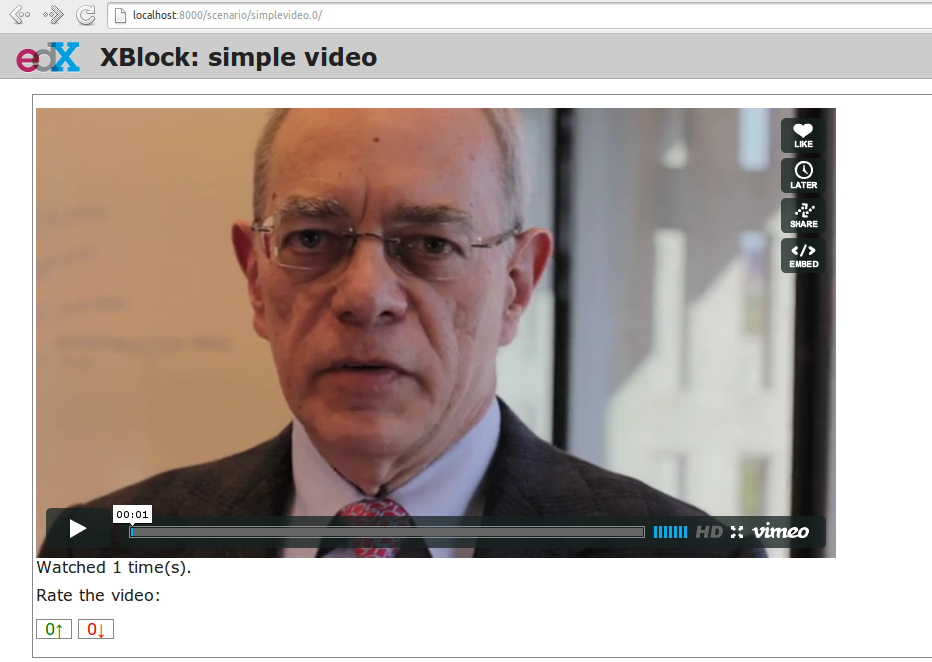
You should now be seeing something like this after you watch the video a couple of times:
Deploying to edx-platform
To use the SimpleVideoBlock in the Studio and LMS, there are three
things you need to do:
- Make sure the
ALLOW_ALL_ADVANCED_COMPONENTSfeature flag is set toTrue; - Install
xblock-simplevideointo the virtual environment you are running the studio from; - In the Studio, got to Settings -> Advanced Settings and add
"simplevideo"to theadvanced_moduleslist.
Assuming you are running edX from the devstack, this is how you can do this:
ALLOW_ALL_ADVANCED_COMPONENTSis set toTrueby default in the devstack environment, so this part is already taken care of.- The easiest way to do this is to make your local folder containing
the simplevideo code available to the devstack machine. You can do
that by adding the following line to your
Vagrantfileand restarting the machine:Then SSH into the devstack machine and install1config.vm.synced_folder "/path/to/xblock-simplevideo", "/edx/xblock-simplevideo", create: true, nfs: truexblock-simplevideoto the edxapp environment usingpip:1 2 3
$ sudo su edxapp $ cd /edx/xblock-simplevideo $ pip install -r requirements.txt - Restart the Studio, navigate to Settings -> Advanced Settings in your
course, and set the
advanced_modulesfield to["simplevideo"].
You should now be able to see an "advanced" button under "Add New Component" when you are editing a unit. If you click the button, you will be able to add the "simplevideo" XBlock to your course.
At this point, the block is unusable because there is no way to set the
href, maxwidth, and maxheight attributes. We need to
implement the studio view to be able to set the attributes through the
Studio UI.
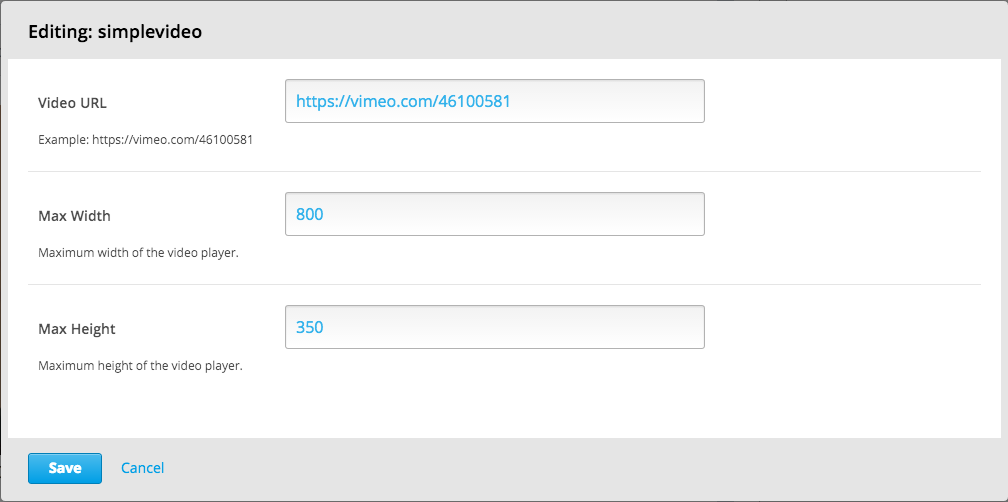
The Studio view
To implement the edit UI, we need add the studio_view method to the
SimpleVideoBlock class:
1 2 3 4 5 6 7 8 9 | |
The studio_view method looks similar to the student_view method.
It constructs a fragment from a static template. The
static/html/simplevideo_edit.html template contains the form the is
displayed to the user when editing the block in the Studio:
1 2 3 4 5 6 7 8 9 10 11 12 13 14 15 16 17 18 19 20 21 22 23 24 25 26 27 28 29 30 31 32 33 34 35 | |
We used some common Studio CSS classes to style the form so that it looks consistent with the rest of the Studio.
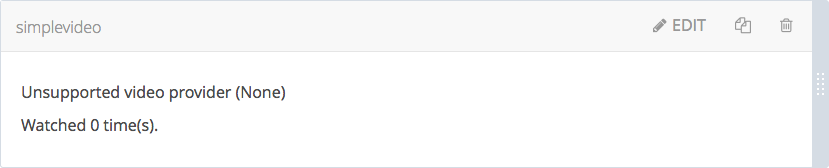
At this point you should be able to see the form when clicking the "edit" button on the simplevideo block.
The "Save" button doesn't do anything yet. In order to get it to
actually save the attributes, we need to add another JSON handler
function to the SimpleVideoBlock class and add some JavaScript to
wire it up.
Let's call the JSON handler studio_submit. It simply sets the
attributes to the values it receives in the POST request. It would be
good to have some validation logic in place, but we'll keep it simple
for the tutorial:
1 2 3 4 5 6 7 8 9 10 | |
The static/js/simplevideo_edit.js JavaScript file should look like
this:
1 2 3 4 5 6 7 8 9 10 11 12 13 14 15 16 17 18 | |
We attach a click listener that POSTs the attribute values to our JSON
handler when clicking the "Save" button. Just before POSTing the data,
we call runtime.notify('save', {state: 'start'}), and then call the
same function again with {state: 'end'} when the requests completes.
The first invocation closes the modal window with the form and displays
a "Saving..." message in the Studio. The second invocation hides the
message and reloads the block view.
We also attach a click listener to the cancel button, which calls
runtime.notify('cancel', {}) which causes the modal window with the
form to close.
We need to add the JavaScript to the fragment that is returned from the studio_view method:
1 2 3 4 5 6 7 8 9 10 11 12 13 | |
The simplevideo block is now fully functional.
Source repository
A repository containing the code from this tutorial can be found at https://github.com/open-craft/xblock-simplevideo.